Advanced topic: Installing the Frankenwallet on an internal disk partition
- Common conceptions about encrypted Linux systems: and how we will improve upon them
- Installation procedure
- Verification of encrypted startup & new partitions
- Final step: Stop GRUB rebuild after host machine kernel updates
- Removing an internal Frankenwallet
- Troubleshooting
- Alternative configuration: install encrypted partitions to a larger external drive
The simple, default case of Frankenwallet installation is for it to be installed on an external drive: a fast memory stick or (even better) a SATA SSD attached with a SATA-to-USB cable or equivalent. To increase performance without sacrificing physical security, more accomplished users may consider keeping their Frankenwallet secured inside their host computer as an encrypted, bootable partition of their internal disk.
Users thinking of this possibility will generally already have their PCs set up for dual boot between Linux and Windows. This generally involves GRUB, which locates other bootable partitions when configured and allows them to be selected from a boot menu when the system starts. To understand and implement these instructions properly, users should have some familiarity with how GRUB works from personal experience.
Though this procedure has been rigorously tested to ensure that non-experts can follow it, users also should be aware that it will shift the focus of their desktop more towards security… for instance, having an encrypted GRUB which must be decrypted with a password, with some inconvenience and delay, every time the system starts: even when not intending to use the Frankenwallet.
tip
Users unprepared for this can also adapt these instructions for other encrypted configurations: for instance, installing the Frankenwallet with all its partitions encrypted onto a fast external USB SATA SSD drive and leaving the bulk of its storage accessible unencrypted from the host system, as a “backup drive” would be (see Alternatives).
In any case, like the rest of the Frankenwallet instructions, this material is intended as a starting point for users to develop a secure workflow according to their own preferences and requirements for convenience.
Common conceptions about encrypted Linux systems: and how we will improve upon them
/boot is generally not encrypted
At the time of this writing, if you search Google for debian should not encrypt boot partition, its AI Overview says:
- Debian installations typically do not encrypt the boot partition because the bootloader (GRUB) cannot access it to decrypt it, which would cause a boot failure.
- While it is technically possible to encrypt the boot partition, it is complex, provides little security benefit compared to other methods, and is generally considered unnecessary.
- Instead, most full-disk encryption setups in Debian leave the boot partition unencrypted and encrypt the root partition, which contains sensitive system files.
Installing from the Ubuntu installer (also used by both Debian and Mint) with what it calls “whole disk encryption” will do exactly this: it will set up an encrypted volume for all system and user files but leave the UEFI and /boot partitions unencrypted. This is acceptable for an external drive that’s removed during normal operation, but security conscious users would recognise the following flaw if installing this way on any part of an unremovable disk:
residual security risk for unencrypted boot partitions
A motivated hacker of your host system, seeing that you also have an encrypted partition and a separate unencrypted
/bootpartition, could substitute a hacked kernel or initramfs there that would provide remote access to devices or other back doors.
According to the institutionally promoted conception, preventing this mode of intrusion is considered of “little security benefit” and “generally unnecessary” — even though the vulnerability would provide a technical means of access to your encrypted data stored in an internally installed Frankenwallet.
Leaving /boot unencrypted suits the current state of the industry because the only defence against such tampering is the centralised institutional signing of boot images so they can be used with Secure Boot enabled in the computer’s BIOS settings. However, long term users of Linux will know that this signing is often delayed: and that “secure boot” would need to be disabled if ever customising one of those boot images (e.g. if setting up a keyfile).
Therefore it is unfortunate for our security requirements that Linux platform engineers don’t consider tamper-proofing the the /boot partition a priority… since this is exactly how a motivated hacker would continue their search for cryptocurrency on a hacked host system.
What can be done about it
The discrimination against this idea means that there is little documentation on the subject: with a massive learning curve full of trial and error, and with Internet search providing much outdated, contradictory, and incorrect information. The unpopularity of truly full-disk encryption (including /boot) has led to these practical consequences observable as of late 2025:
➤ The Ubuntu installer will only set up encryption automatically when selecting the “whole disk” — which must wipe out everything else on that disk in the process — and will still leave you with an unencrypted /boot partition.
➤ The selection of an encrypted partition to be used for your system and user files (root = /) must be done manually through an undocumented selection from a list of partition types.
➤ Though Linux allows keeping /boot in an encrypted root partition, the Ubuntu installer will not allow it (this is either an unjustifiable “feature” or a bug that’s existed for several years).
➤ Popular procedures to install the new encrypted Linux “alongside” another partition rely on a gimmick in the installer (illustrated here and criticised elsewhere) which is generally acknowledged to be a bug that might be removed at any time.
➤ The Ubuntu installer will not install “alongside” Linux, so can only use the disk space belonging to Windows or another OS (or another partition, which it will never use all the space from).
➤ The version of encryption used by the installer, LUKS2, is incompatible with GRUB —and so will fail to produce a boot menu entry for that /boot partition even though Linux itself will be successfully installed.
➤ Even when manually creating a /boot partition with the compatible version LUKS1, the default GRUB configuration will not recognise encrypted partitions without a special option being added which isn’t in the default files: again, causing these installations to fail.
The instructions below will fix all of these problems and provide Frankenwallet users a means of developing this configuration. Therefore it should be considered a “proof of concept” rather than a recommendation for all users: especially important since the concept itself is not well supported by either the Linux community or its architects.
Still, the author believes that bringing a more advanced encryption to the level of non-experts — at a medium level of detail and complexity chosen for the procedure below — will broaden the reach of workflow encryption through open source software and ultimately reduce dependence upon hardware wallets.
Installation procedure
These particulars and screenshots are from the latest Linux Mint version 22.2 (Zara) and its installation media for the Cinnamon Edition (chosen vs. the Xfce edition due to irregularities in its file manager “Thunar”). You are welcome to choose a different edition if you believe it will better suit your workflow: as long as it’s Debian based, the preparation & installation procedures will be the same.
The process below follows the same general procedure as installing on an external drive (currently illustrated with the older Ubuntu installation media) from these first two steps:
… so be sure to return to the third step — once this system is set up — to continue setting up your internal Frankenwallet as you would the external one: Secure your encrypted partition against any Internet usage
tip
The official Linux Mint Installation Guide currently provides a better learning experience than the Install Ubuntu Desktop guide provided by Canonical: the Mint instructions are more detailed and answer more questions in advance.
Also please use standard system administration precautions: like ensuring uninterrupted power for the computer and making full backups of all essential data before continuing.
Use gparted to make space for /boot & root partitions
First, run the command gparted — either from the Terminal shell or by entering its name from the lower-left corner menu — to display and modify the partition table on your internal disk:
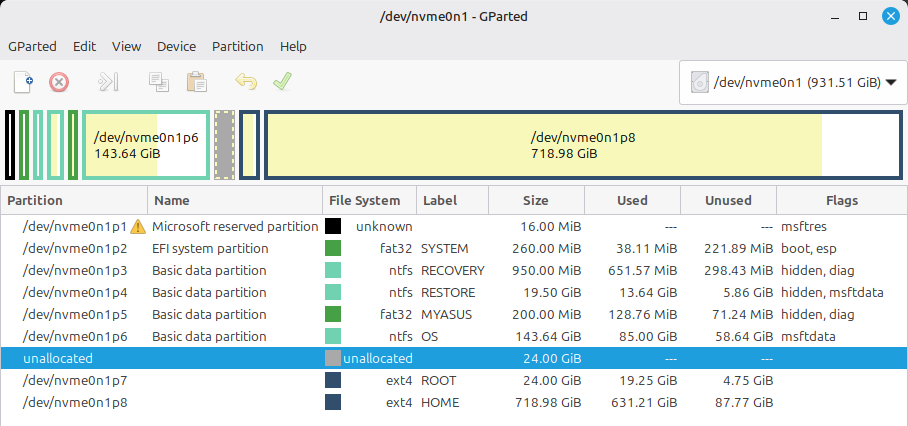
The image incidentally shows enough free space in the middle of the disk to install the Frankenwallet: but generally your computer’s internal disk will have no space between its partitions. So we’ll follow a procedure to take some space out of the drive from the partition which you can see has the most free space: which in this case is the Linux HOME partition.
(please forgive the image quality for using photographs to illustrate choices from pop-up menus: which disable the Linux Mint built-in screenshots)
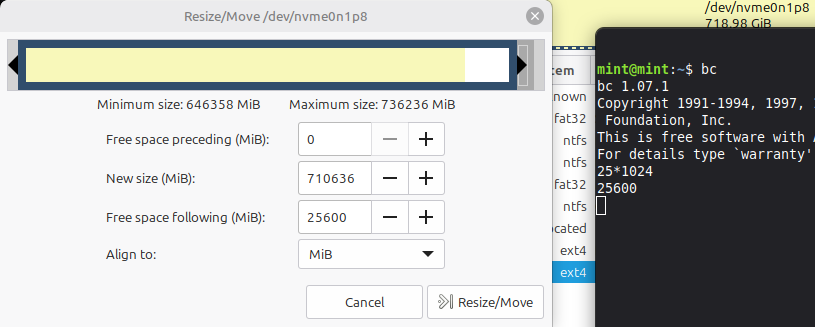
We right-click that partition and select Resize/Move:

… to move the end of this partition back by the required amount of space:
be advised
Moving the end of a partition backward is generally much faster & more error-resistant than trying to move forward the beginning of a partition: which contains the densest concentration of file system structure.
If the process of resizing your partition is interrupted before finishing, your data will likely be irrevocably lost.
We create space here for two partitions (note 0 space “preceding” indicates the filesystem won’t need to move: only truncating the end):
- 1GB (1024 MB) = the encrypted
/boot - + 24GB = the encrypted root (15GB minimum + long term space for software & any OS updates)
- = 25GB = total to shrink the existing partition
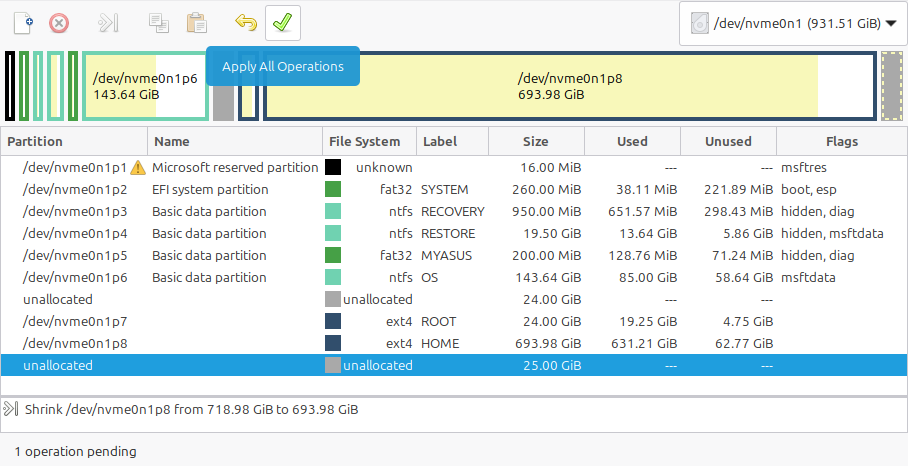
For those who have not used gparted before, keep in mind the requested changes appear in a list of pending operations below, while showing you how your disk will look afterward, but will not actually be applied until hitting the Apply All Operations button at the top:
… confirming:
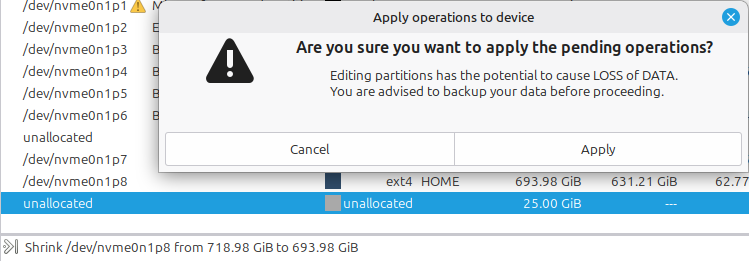
… and waiting for the procedure to complete:
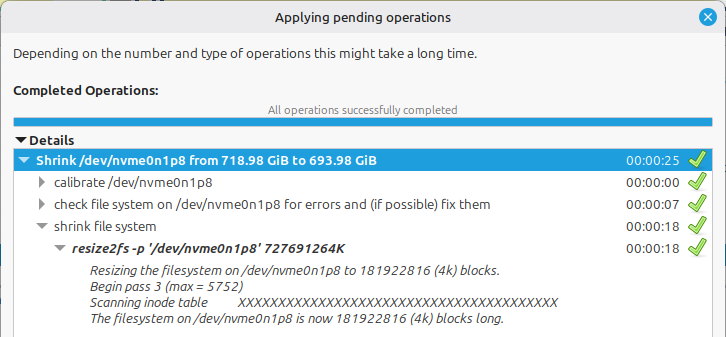
The result will be a 25GB space at the end of the shrunken partition:

We select that unallocated space to create two partitions within it (with the New selection):

… selecting cleared for File system: to avoid interference by the OS installer or other tools, first creating the 1GB (1024 MB) smaller filesystem:
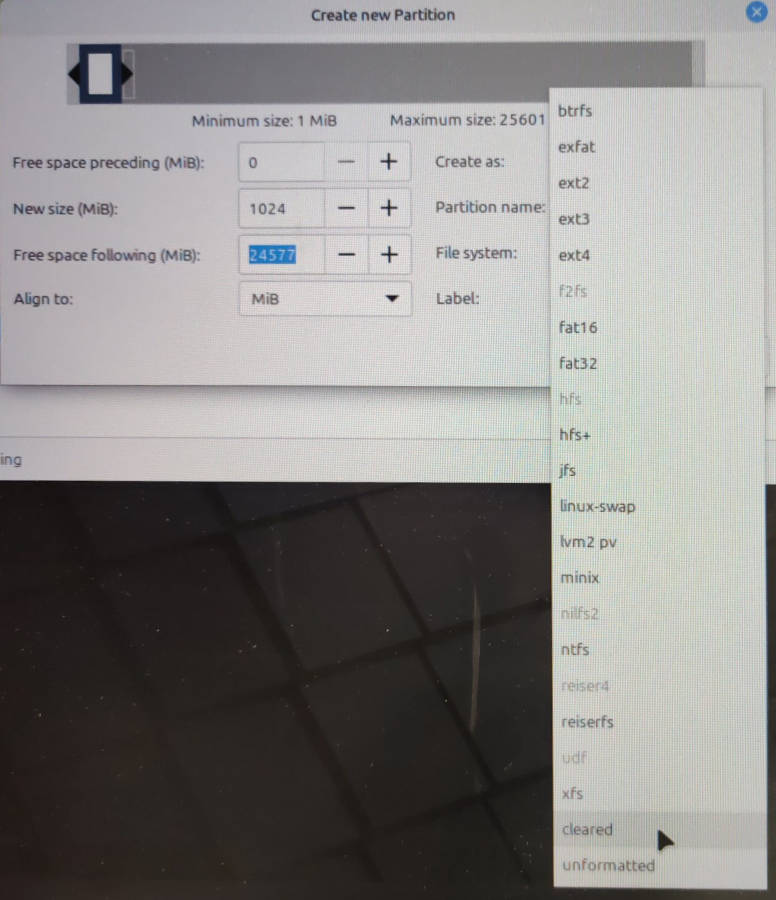
… and then doing the same to create a 24 GB cleared partition in the larger space:
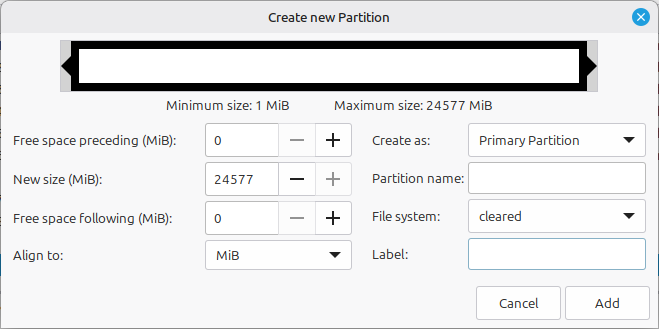
Upon completion, you’ll have 2 new cleared partitions:

After “Applying all operations” again (
gpartedwill warn you if you quit without doing that!), these will show ingpartedas “unknown” — sinceclearedis not a filesystem state, but only a one-time procedure to confirm no artefacts suggesting the presence of a filesystem remain:

Preparing the encrypted /boot at the command line
After quitting gparted we set up the smaller /boot partition as an encrypted device by hand: due to the restriction listed above that the default encryption method (LUKS2) isn’t currently usable by GRUB (which requires LUKS1).
confirmation
You can check the distinction between the two encryption versions at this standard industry reference here: In summary, the LUKS container for
/bootmust currently use LUKS version 1 whereas the container for the operating system’s root filesystem can use the default LUKS version 2.
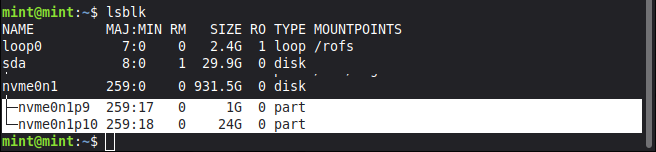
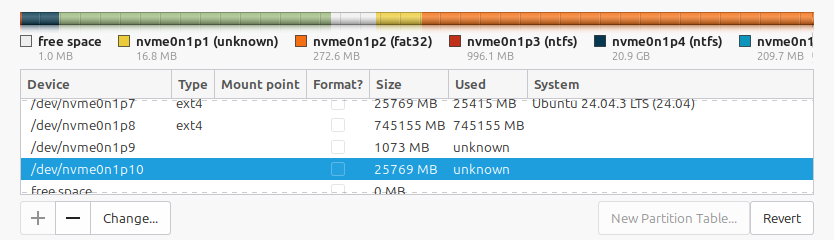
Open a Terminal shell and use lsblk to confirm the 2 new partitions you created after the end of the larger partition:
$ lsblk
… where you should see your two new partitions next to each other. Be sure to note their names again, and you can copy & paste these devices into subsequent commands as necessary:
First encrypt the smaller (/boot) partition, using the high-security Frankenwallet password as a passphrase: because any attacker knowing this LUKS passphrase would be able to modify the resulting encrypted /boot from your host system:
root@mint:/home/mint# cryptsetup luksFormat --type=luks1 /dev/<bootPartition>
WARNING!
========
This will overwrite data on /dev/nvme0n1p9 irrevocably.
Are you sure? (Type 'yes' in capital letters): YES
Enter passphrase for /dev/nvme0n1p9:
Verify passphrase:
root@mint:/home/mint#
Then we mount it (which will also confirm your passphrase again); noting the term here newboot is only a placeholder and only needs to be consistent through the installation procedure:
root@mint:/home/mint# cryptsetup open /dev/nvme0n1p9 newboot
Enter passphrase for /dev/nvme0n1p9:
root@mint:/home/mint# ls /dev/mapper
control  newboot
There’s no need to create & configure a volume for the Frankenwallet root (the larger of the two partitions) since we will create that in the installer screens at the next stage.
However, those installer screens won’t be able to use the new /boot without a “partition table” (likely a bug or artefact in the installer)… so to bypass this problem we take this final step to create a “dummy” filesystem there:
root@mint:/home/mint# mkfs.ext4 -L FWBOOT /dev/mapper/newboot
mke2fs 1.47.0 (5-Feb-2023)
Creating filesystem with 261632 4k blocks and 65408 inodes ...
Writing superblocks and filesystem accounting information: done
Apply these partitions to the regular installation procedure
Now we can finally run the installer program that’s been placed on the Mint installation screen:
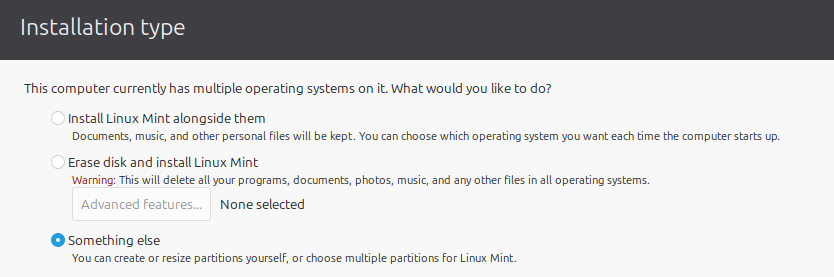
The first few screens will be as in the standard Ubuntu installation — with choices the same as in Updates and other software, mainly avoiding anything that could be proprietary or closed-source — until choosing this selection from this screen:
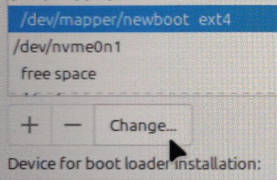
We will hit the Change button after selecting each of the resources we just created. First, the encrypted /boot partition, which we will use now as an entry in /dev/mapper rather than the list of disk partitions further below:

Make sure it will still be used as an EXT4 filesystem (you can format it again, or not: it doesn’t matter), and most importantly choose it to be used as /boot in the pull-down menu:
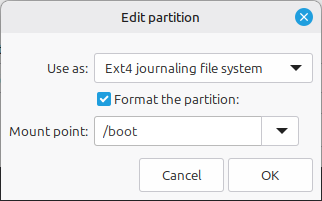

If it complains about “no partition table” on the
/dev/mapperdevice before it gets to this stage, it means you forgot to a create filesystem for it as in the previous section!
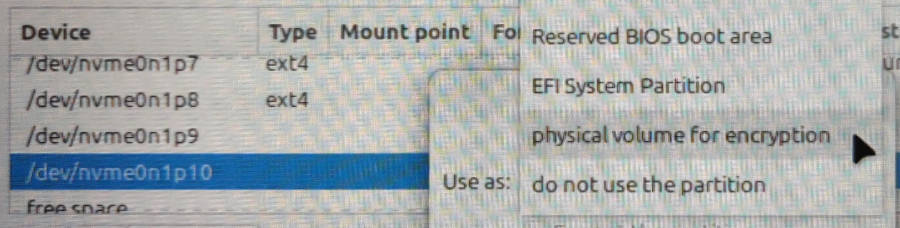
Next we prepare the encrypted root filesystem. Go down & select the larger disk partition we created and click Change:
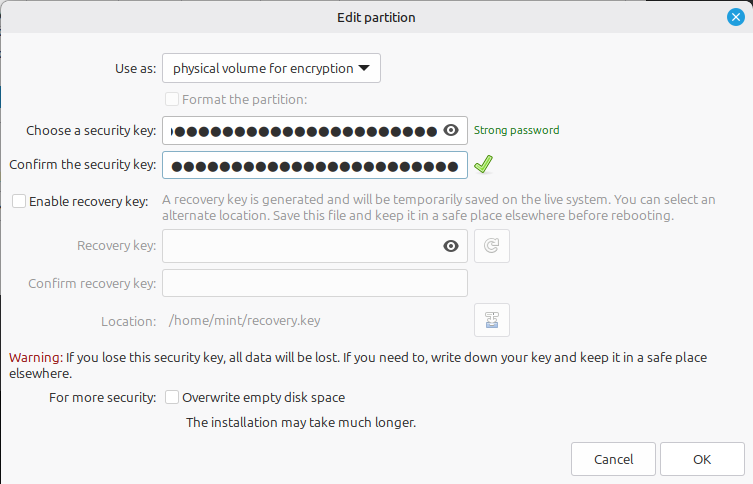
… and then choose this undocumented (though long supported) selection for the partition type, called physical volume for encryption:
This opens up a dialogue box where you can again apply the high-security Frankenwallet password to the encrypted volume that will contain your Frankenwallet’s / directory and all your confidential files with potentially cleartext keys: i.e. you certainly want your maximum security password here!
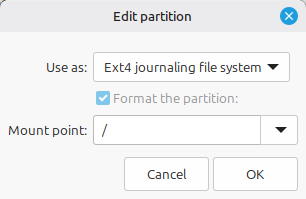
After the encrypted volume is created, it still won’t be used to contain the root (/) directory yet:

… until you select the partition again, hit Change one more time, and select / as a Mount point:
… and then you’ll be ready to hit the Install Now button when both /boot and / show that they’ll be set up as shown here:
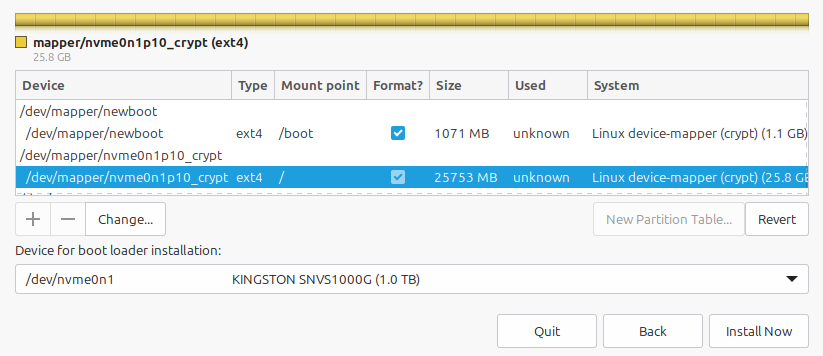
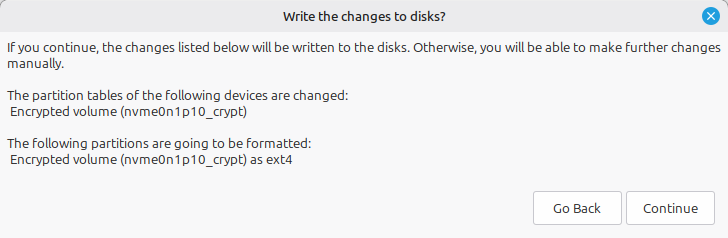
After hitting the Install Now button, if you’ve prepared properly you’ll get a confirmation like this:
don’t worry
This comment that it will be changing “partition tables” is no cause for concern because it only applies to the virtual device for the encrypted volume (in this case,
nvme0n1p10_crypt): not your disk’s partition table!
This inappropriate warning is given because the main option of the installer (the one we can’t use) creates a “logical volume” for encrypted partitions used for the operating system: and so it’s displayed here even though we haven’t set up one of these. 😜
“Wait… Why can’t I just put
/bootin my root, where it normally would be?”
This seems like it would make sense because / is already being encrypted, and it would save the trouble of having 2 separate encrypted filesystems. In fact, this configuration is known to work in Linux even if /boot is encrypted. But if you select this in the installer, it will say:
- Encryption configuration failure
- You have selected the root file system to be stored on an encrypted partition. This feature requires a separate
/bootpartition on which the kernel andinitrdcan be stored. - You should go back and setup a
/bootpartition.
Here is a point to consider: even though it would be possible (at an expert level) to merge these two partitions after the installation:
Due to the limitation of GRUB compatibility to LUKS1, this would also mean your Frankenwallet root — containing all your vital, high-value confidential data — would be encrypted with an older and less secure encryption method.
Manually fine-tune the initial GRUB configuration
The final 2 installation screens — to set the time zone and set up your user account — are the last before the Linux software is set up, and will be as previously documented in Enter user level information.
Unfortunately the GRUB building options are not set properly to install an encrypted /boot partition unless the official “Erase and install on whole disk” option is selected. So we must ensure manually that the option GRUB_ENABLE_CRYPTODISK=y is added to the GRUB configuration file /etc/default/grub at the root /target where the new system is being built.
watch out
If the GRUB configuration isn’t “patched” with this option, the installation will fail with the message: Unable to install GRUB … Executing
grub-installfailed … This is a fatal error.
This quick patch can be done in 1 of two ways, depending upon the exact distro & installer version you are using. While at one of these final 2 screens (the “time zone” or “user info” pages), open a Terminal shell and:
➤ 1. First check if /target is already mounted: which it likely will be to set the new system’s time zone. If so you’ll see a /target directory in the Terminal and file manager, and you can simply edit the file
/target/etc/default/grub
… to add the following line anywhere in that file:
GRUB_ENABLE_CRYPTODISK=y
(You can also add it in a separate file as in #2 below… the effect is the same.)
➤ 2. If /target is not accessible yet: open a Terminal and execute the following shell command, which will wait for /target to be created by the installation procedure before adding that line to a config file in the new system’s /etc/default/grub.d directory:
while [ ! -d /target/etc/default/grub.d ]; do sleep 0.1; done; echo "GRUB_ENABLE_CRYPTODISK=y" > /target/etc/default/grub.d/local.cfg
ready to go!
The system installation will begin after submitting the User Info screen (on Mint) or after one final confirmation of the partitions it will use (on Ubuntu), and will generally be distro-dependent: so ensure you’ve done the GRUB patch before your save your User Info!
When the installation is successful, you’ll see this confirmation:
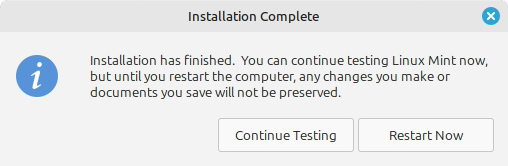
… and if this has happened with no complaints about GRUB failing to build, hitting the Restart Now button after the installation will reboot with the newly encrypted GRUB components.
Verification of encrypted startup & new partitions
After the installation completes — upon hitting “Restart”, removing the installation media, and starting your computer again — as expected, you’ll first see a sparse GRUB prompt for the LUKS passphrase for the /boot volume (showing its disk partition and UUID) which it needs to read before any bootable partitions are accessible from the usual menu:

Entering the passphrase successfully will respond like this (be prepared for about a 20-second decryption time on a modern system):

If the password is entered incorrectly, you’ll see a sparse text-only screen with the
grub>prompt that is displayed when there is no readable GRUB configuration. It won’t prompt to retry the password, so generally the best way to proceed is to turn the computer off & on again.
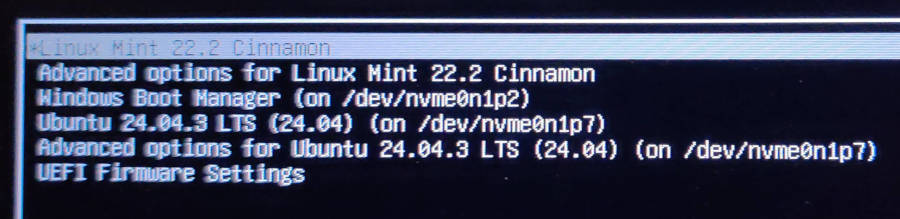
Then you’ll see the familiar GRUB menu, in which the Frankenwallet installation will appear at the top (since it generated GRUB) — where it will also be the new default selection — and your regular operating system(s) will appear further down the menu (in this case, the author’s host Ubuntu):
tip
Both the default selection and the ordering of items can be altered any time by regenerating GRUB in the internal Frankenwallet according to the standard Linux GRUB configuration procedures: which are Linux prerequisites & outside the scope of this document.
The decryption of the Frankenwallet partition itself (the root, not the /boot that we just decrypted from GRUB) will proceed as illustrated for the regular installation: “Logging in” to Frankenwallet
FYI: Why the Frankenwallet password must be entered twice
If you read the first section of this page carefully, you won’t be surprised when you are expected to enter this password a second time. This is because the encrypted root filesystem also needs to be unlocked: in fact by the second password that you entered into the installer screen under physical volume for encryption.
There are standard procedures to unlock that filesystem automatically: which can be done securely since now the root filesystem, which can store a LUKS encryption Keyfile, is also encrypted. These procedures are relatively complex and error-prone, and so would require a higher technical level if included here. The best illustrations on setting this up in the author’s experience are in these two guides:
- Full_Disk_Encryption_Howto_2019 > Post-Installation Steps = a run-through of a the setup procedure adding this feature from OS installer media (after installing, or in the future)
- Notes on installing Linux Mint 22.2 (full disk encryption) > Asking for a passphrase is too much to ask? = a more modern description also linking to a number of current related tutorials
Besides the technical level, in the author’s opinion this strategy is not much of a mitigation on the double password entry problem: since even with a keyfile users would still be required to enter the Frankenwallet password even when using the insecure (host) system. If this presents a long-term problem, operators should consider the “hybrid” configuration of a bootable external partition on an SSD backup drive offered as an alternative configuration at the end of this document.
Verify encrypted partitions from new system shell prompt
Now you can rejoice when you see, in the new Frankenwallet’s Terminal shell, that your 2 newly created partitions for / and /boot are encrypted:
cosd@coldfw:~/Desktop$ df /
Filesystem 1K-blocks Used Available Use% Mounted on
/dev/mapper/nvme0n1p10_crypt 24578384 7108756 16195772 31% /
cosd@coldfw:~/Desktop$ lsblk
NAME MAJ:MIN RM SIZE RO TYPE MOUNTPOINTS
nvme0n1 259:0 0 931.5G 0 disk
├...
├─nvme0n1p9 259:9 0 1G 0 part
└─nvme0n1p10 259:10 0 24G 0 part
└─nvme0n1p10_crypt 252:0 0 24G 0 crypt /
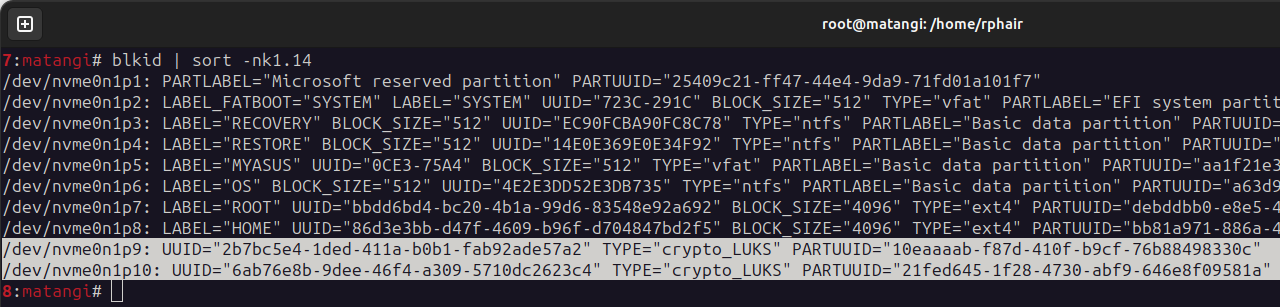
cosd@coldfw:~/Desktop$ blkid
/dev/mapper/nvme0n1p10_crypt: UUID="ad11c9ab-..." BLOCK_SIZE="4096" TYPE="ext4"
/dev/nvme0n1p9: UUID="2b7bc5e4-..." TYPE="crypto_LUKS" PARTUUID="10eaaaab-..."
/dev/nvme0n1p10: UUID="6ab76e8b-..." TYPE="crypto_LUKS" PARTUUID="21fed645-..."
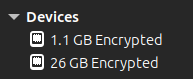
Verify encrypted partitions from insecure host machine
You can especially rejoice when you see that the new partitions are also encrypted, and therefore inaccessible to hackers, when next rebooting into your host system… as per this view in the File Manager, also verifiable by blkid as above:
Final step: Stop GRUB rebuild after host machine kernel updates
As long as your host system contains a Frankenwallet (or any other encrypted partition that you still need to be bootable from GRUB), you will need to suppress the normal regeneration of GRUB every time your OS repositories push out a new version of the Linux kernel and its associated files.
Otherwise the GRUB regenerated on your insecure host system will lose its Frankenwallet entries: and, of course, to mount these encrypted filesystems onto the host system (so that a complete GRUB could be regenerated there) would be a severe violation of the Frankenwallet principles.
Therefore the best approach is to allow the kernel updates to be installed but only regenerate GRUB when booted into the Frankenwallet… which will in turn probe for the new host kernel and insert its updated boot entries into your GRUB.
The current best practice to suppress GRUB from rebuilding when there’s a kernel update, according to the consistently recommended solution also summarised by Google AI (linux disable grub rebuilding when new kernel), is:
sudo apt-mark hold grub-pc grub-efi grub-common
which will confirm:
grub-pc set on hold.
grub-efi set on hold.
grub-common set on hold.
If you forget to do this, you’ll lose access to your Frankenwallet the next time GRUB updates from a new kernel release on your host environment.
If this does happen, just reboot into the Frankenwallet and follow the standard instructions to reinstall GRUB; usually just running these two commands:
grub-install /dev/nvme0n1 # your disk without any partition suffixupdate-grub # to rebuild GRUB from its config files
Removing an internal Frankenwallet
You’ve already have seen how gparted would work to delete the Frankenwallet’s disk partitions and reclaim the disk space that they used… so the only other changes required on the host system are:
➤ 1. Undo the suppression of GRUB rebuilding after new kernel releases that was required in the previous step:
sudo apt-mark unhold grub-pc grub-efi grub-common
which will confirm:
Cancelled hold on grub-pc.
Cancelled hold on grub-efi.
Cancelled hold on grub-common.
➤ 2. Then regenerate your host system’s own native GRUB, which will also remove any requirement for a decryption password to be entered the next time the system boots:
grub-install /dev/nvme0n1 # your disk without any partition suffixupdate-grub
Troubleshooting
The most important emergency tool for Linux installers & administrators to be aware of is boot-repair (documented best on Ubuntu, but working equally well across the whole Linux ecosystem) which collects information about your bootable partitions and rebuilds GRUB automatically.
boot-repair may need some manual work to recognise your Frankenwallet encrypted /boot drive (see this issue for that use case)… or you may wish to use it to restore your computer’s original configuration, which will revert any special procedures for entering the decryption password before the GRUB menu and avoid having to suppress automatic kernel upgrades on your host system.
In any case boot-repair is an essential item for Frankenwallet creators to know about — and an essential, commonly used tool in the Linux toolbox — so please keep this handy in any case before & after all Linux installations.
Alternative configuration: install encrypted partitions to a larger external drive
As suggested in the beginning, you may avoid the inconvenience of entering the /boot decryption password every time the system is booted (even when only intending to use your regular host system) by following the more common security configuration of leaving the Frankenwallet on an external drive… but using a high performance USB SATA SSD drive that you also use for other things like data transfer and system backups.
Technically you could also do this with a high performance memory stick, but the required performance rating for a good Frankenwallet UX on a memory stick would be expensive: and even then it would have trouble keeping up with the Linux disk cache in a way that causes periodic hanging, and possibly filesystem corruption, from accumulated delays on flushing out all written file data.
The author has seen excellent external Frankenwallet performance through a modern, fast SSD attached with a USB-to-SATA cable as approximately shown in this illustration: though specially made USB and eSATA SSD drives will of course work just as well or better.
This is also the currently best recommended option if you might otherwise consider having a second Frankenwallet on the internal disk: or even more than two. Otherwise you will have to go through a manual procedure to also mount the encrypted partition(s) of all other Frankenwallets every time regenerating GRUB on one of the Frankenwallets.
The installation procedure above easily adapts to installing on a large external drive, even one that’s partially used: perhaps more easily, since you’d only have to move your external device’s data partition without the concern of making an operating system corrupted or unbootable. Also, you would be spared any difficulty of changing the boot/GRUB behaviour requiring a password each time you boot your unencrypted system… since the device with the encrypted GRUB on it could be detached.
The setup procedure would be:
➤ Boot into your installation media as above with the external drive attached.
➤ Prepare your partitions the same way as above: either resizing your drive’s data partition to create the required space at the beginning (will take longer to shrink and especially to move its beginning) or at the end (generally much faster).
➤ Prepare the /boot partition in the same way at the command line, and set up the root and /boot partitions by selecting them on the external drive the same way in the installer.
➤ Make sure you request that GRUB be installed on the external drive (the default will be the internal drive!), so it can be used independently of the host computer.
➤ You will also need to add the GRUB options in exactly the same way as above.
➤ Once the device is built, no modifications to the host computer are necessary.
be prepared
You can immediately run the standard procedure for
boot-repair(as per Troubleshooting) if the installer “decides” to remove GRUB from your computer’s internal disk in the act of installing it on the new drive: sometimes done to avoid a “duplicate” GRUB when there is more than one disk connected during the install.
However, there is no more risk of this happening than when you likely first created a Frankenwallet on a memory stick: it appears dependent upon how your BIOS handles external drives, the type of drive hardware, whether or not you can disconnect an internally connected disk in BIOS before the installation procedure, the generation of the installer, and other system dependent factors. 😎